
Requirements:
- SimpleSAMLphp library (Latest Version is recommended. My version in simplesamlphp-1.14.8).
- Drupal 10 (Latest Version).
- SimpleSAMLPhp_auth module (https://www.drupal.org/project/simplesamlphp_auth).
SimpleSAMLphp configurations:
For the site which is acting as the Service Provider, following are the configurations that need to be done.
- Download the SimpleSAMLphp library from (https://simplesamlphp.org/download ).
- Put the folder in the level of your docroot.
- In docroot directory, create a symbolic link (named simplesaml) that points to simplesamlphp-1.14.8/www directory in the DRUPAL_ROOT directory.
Command to create symbolic link is (My version is simplesamlphp-1.14.8):
ln -s simplesamlphp-1.14.8/www ./simplesamlTo generate certificates, create cert folder inside the simplesamlphp-1.14.8 folder as (DRUPAL_ROOT/simplesamlphp-1.14.8/cert)
Run the following command inside the cert folder from terminal:
openssl req -new -x509 -days 3652 -nodes -out saml.crt -keyout saml.pemThis will create two files saml.crt and saml.pem.
- Configure config.php which will be inside DRUPAL_ROOT/simplesamlphp-1.14.8/config/config.php and update configurations as below:
- Change the ‘store.type’ as ‘sql’
- ‘store.sql.dsn’ as ‘mysql:host=localhost;dbname=db_name’ here the host will differ according to your server and dbname will be the your database name.
- 'Store.sql.username' as ‘server database user_name’
- 'Store.sql.password' as ‘server database password’
- Enable this functionality 'enable.saml20-idp' => true, this setting is to receive the IDP request.
- Change the ‘auth.adminpassword’, ‘technicalcontact_name’,
- ‘technicalcontact_email’ as per your requirement.
- Add this snippet after config = array(); (i.e) at the last line.
- $config['baseurlpath'] = 'http://'.
- $_SERVER['HTTP_HOST'] .'/simplesaml/'; (its mandatory).
- After this step you can hit the above url.e.g:(example.com/simplesaml)
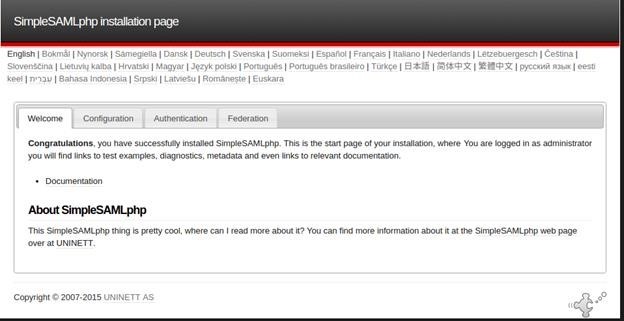
Login as admin and type the password which you have assigned to ‘auth.adminpassword’ and the screen will look like the image below:
Goto Federation Tab and copy the SAML 2.0 SP Metadata and send it to the Identity Provider site administrator. SAML 2.0 SP Metadata will look like:
$metadata['http://example.com'] = array (
  'SingleLogoutService' =>
    array (
      0 =>
        array (
          'Binding' => 'urn:oasis:names:tc:SAML:2.0:bindings:HTTP-Redirect',
          'Location' => 'http://example.com/simplesaml/module.php/saml/sp/saml2-logout.php/default-sp',
        ),
      1 =>
        array (
          'Binding' => 'urn:oasis:names:tc:SAML:2.0:bindings:SOAP',
          'Location' => 'http://example.com/simplesaml/module.php/saml/sp/saml2-logout.php/default-sp',
        ),
    ),
  'AssertionConsumerService' =>
    array (
      0 =>
        array (
          'index' => 0,
          'Binding' => 'urn:oasis:names:tc:SAML:2.0:bindings:HTTP-POST',
          'Location' => 'http://example.com/simplesaml/module.php/saml/sp/saml2-acs.php/default-sp',
        ),
      1 =>
        array (
          'index' => 1,
          'Binding' => 'urn:oasis:names:tc:SAML:1.0:profiles:browser-post',
          'Location' => 'http://example.com/simplesaml/module.php/saml/sp/saml1-acs.php/default-sp',
        ),
      2 =>
        array (
          'index' => 2,
          'Binding' => 'urn:oasis:names:tc:SAML:2.0:bindings:HTTP-Artifact',
          'Location' => 'http://example.com/simplesaml/module.php/saml/sp/saml2-acs.php/default-sp',
        ),
      3 =>
        array (
          'index' => 3,
          'Binding' => 'urn:oasis:names:tc:SAML:1.0:profiles:artifact-01',
          'Location' => 'http://example.com/simplesaml/module.php/saml/sp/saml1-acs.php/default-sp/artifact',
        ),
    ),
  'contacts' =>
    array (
      0 =>
        array (
          'emailAddress' => 'abc@example.com',
          'contactType' => 'technical',
          'givenName' => Example,
          'surName' => Example,
        ),
    ),
  'certData' => ‘...certificate string...’
  'redirect.validate' => true,
);
Paste the IDP metadata which you will receive from your IDP Provider inside /simplesamlphp/metadata/saml20-idp-remote.php. SAML 2.0 IDP metadata will look like:
$metadata['http://your-idp-domain/simplesaml/saml2/idp/metadata.php'] = array(
  'entityid' => 'http://your-idp-domain/simplesaml/saml2/idp/metadata.php',
  'contacts' => array(
    0 => array(
      'contactType' => 'technical',
      'givenName' => 'XYZ',
      'surName' => 'XYZ',
      'emailAddress' => array(
        0 => 'abc@gmail.com',
      ),
    ),
  ),
  'metadata-set' => 'saml20-idp-remote',
  'SingleSignOnService' =>  array(
    0 => array(
      'Binding' => 'urn:oasis:names:tc:SAML:2.0:bindings:HTTP-Redirect',
      'Location' => 'http://your-idp-domain/simplesaml/saml2/idp/SSOService.php',
    ),
  ),
  'SingleLogoutService' => array(
    0 => array(
      'Binding' => 'urn:oasis:names:tc:SAML:2.0:bindings:HTTP-Redirect',
      'Location' => 'http://your-idp-domain/simplesaml/saml2/idp/SingleLogoutService.php',
    ),
  ),
  'ArtifactResolutionService' => array(),
  'NameIDFormats' => array(
    0 => 'urn:oasis:names:tc:SAML:2.0:nameid-format:transient',
  ),
  'keys' => array(
    0 => array(
      'encryption' => FALSE,
      'signing' => TRUE,
      'type' => 'X509Certificate',
      'X509Certificate' => '...certificate string...',
    ),
    1 => array(
      'encryption' => TRUE,
      'signing' => FALSE,
      'type' => 'X509Certificate',
      'X509Certificate' => '...certificate string...',
    ),
  ),
);
Now configure the authsource.php inside config folder as shown, inside default-sp array you need to write the following code:
'default-sp' => array(
  'saml:SP', // The entity ID of this SP.
  // Can be NULL/unset, in which case an entity ID is generated based on the metadata URL.
  'entityID' => 'http://yoursitedomain.com', // The entity ID of the IdP this should SP should contact.
  // Can be NULL/unset, in which case the user will be shown a list of available IdPs.
  'idp' => 'http://idpsitedomain/simplesaml/saml2/idp/metadata.php',
  // certificate file name that you have inside your cert folder.
  'privatekey' => 'saml.pem',
  'certificate' => 'saml.crt',
  'NameIDPolicy' => null,
  'redirect.sign' => true,
  'assertion.encryption' => false,
  'sign.logout' => true,
  // The URL to the discovery service.
  // Can be NULL/unset, in which case a builtin discovery service will be used.
  'discoURL' => null,
  /*
  * WARNING: SHA-1 is disallowed starting January the 1st,
  *
  * Uncomment the following option to start using SHA-256 for your signatures.
  * Currently, SimpleSAMLphp defaults to SHA-1, which has been deprecated since
  * 2011, and will be disallowed by NIST as of 2014. Please refer to the following
  * document for more information:
  * http://csrc.nist.gov/publications/nistpubs/800-131A/sp800-131A.pdf
  *
  * If you are uncertain about identity providers supporting SHA-256 or other
  * algorithms of the SHA-2 family, you can configure it individually in the
  * IdP-remote metadata set for those that support it. Once you are certain that
  * all your configured IdPs support SHA-2,  you can safely remove the configuration
  * options in the IdP-remote metadata set and uncomment the following option.
  *
  * Please refer to the hosted SP configuration reference for more information.
  */
  'signature.algorithm' => 'http://www.w3.org/2001/04/xmldsig-more#rsa-sha256',

  /*
  * The attributes parameter must contain an array of desired attributes by the SP.
  * The attributes can be expressed as an array of names or as an associative array
  * in the form of 'friendlyName' => 'name'.
  * The metadata will then be created as follows:
  * <md:RequestedAttribute FriendlyName="friendlyName" Name="name" />
  */

  /*'attributes' => array(
      'attrname' => 'urn:oid:x.x.x.x',
  ),*/
  /*'attributes.required' => array (
      'urn:oid:x.x.x.x',
  ),*/

),
Drupal Configuration:
- Download the Simplesamlphp_auth module.
- Run composer drupal update command so that all the library required for simplesamlphp_auth module gets downloaded in the docroot/vendor folder.
- Enable the module.
- Navigate to Administration > Configuration > People > Simplesamlphp_auth (http://yoursite/admin/config/people/simplesamlphp_auth)
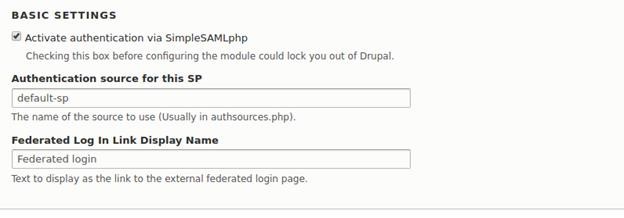
Basic Settings: tick the Activate authentication via SimpleSAMLphp. This should be checked to activate the simplesamlphp integration with Drupal.
Local Authentication:

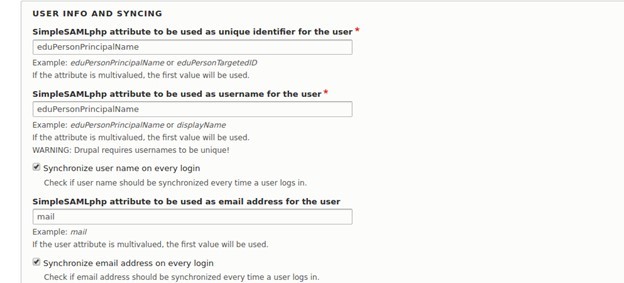
User Info and Syncing:
Add the following snippet to .htaccess (Infrastructure team would need to add this)
RewriteCond %{REQUEST_URI} !/core/modules/statistics/statistics.php$
# Allow access to simplesaml paths
RewriteCond %{REQUEST_URI} !^/simplesaml
# Deny access to any other PHP files that do not match the rules above.
RewriteRule "^.+/.*\.php$" - [F]
After saving the configuration add the following snippet in settings.php. It is mandatory (Must play before making below changes)
// SimpleSAMLphp configuration
# Provide universal absolute path to the installation.
if (isset($_ENV['AH_SITE_NAME']) && is_dir('/var/www/html/' . $_ENV['AH_SITE_NAME'] .'/simplesamlphp-1.14.8')) {
  $settings['simplesamlphp_dir'] = '/var/www/html/' .$_ENV['AH_SITE_NAME'] . '/simplesamlphp-1.14.8';
}
else {
  // Local SAML path.
  if (is_dir(DRUPAL_ROOT . '/../simplesamlphp-1.14.8')) {
    $settings['simplesamlphp_dir'] = DRUPAL_ROOT .'/../simplesamlphp-1.14.8';
  }
}

// SimpleSAMLphp_auth module settings
$config['simplesamlphp_auth.settings'] = [
  // Basic settings.
  'activate' => TRUE, // Enable or Disable SAML login.
  'auth_source' => 'default-sp',
  'login_link_display_name' => 'Login with your SSO account',
  'register_users' => TRUE,
  'debug' => FALSE,
  // Local authentication.
  'allow' => array(
    'default_login' => TRUE,
    'set_drupal_pwd' => TRUE,
    'default_login_users' => '',
    'default_login_roles' => array(
      'authenticated' => FALSE,
      'administrator' => 'administrator',
    ),
  ),
  'logout_goto_url' => '',
  // User info and syncing.
  // 'unique_id' the value which is unique in the saml response coming from IDP.
  'unique_id' => 'mail',
  'user_name' => 'username',
  'mail_attr' => 'mail',
  'sync' => array(
    'mail' => TRUE,
    'user_name' => TRUE,
  ),
];
Now hit example.com/saml_login (SP Site) it should redirect to your (IDP Site)url. After redirecting to the site which is set as IDP, you need to login using (name and password).Hit the Sign in button,you will be again redirected to your (SP Site).Now if you go to you IDP Site you can see that you are logged in to that site too.